Create Your Own Dynamic Gutenberg Block for Wordpress, Part 1
I recently completed a full website redesign that used custom Gutenberg blocks for tailored content management in lieu of the more typical WordPress tools like the ACF plugin. Overall it was a success and the Gutenberg editor proved to be a powerful content management concept; but figuring out Gutenberg wasn’t easy — documentation was fragmented, sometimes missing, and often a bit outdated (looking forward to when this tutorial is outdated).
So to spare others from the slog I went through, I’ve taken what I learned and put it into a comprehensive step-by-step explanation on how to create your own custom Gutenberg blocks. We will create a custom block called Book Details which can add to any post in WordPress a book title, author, and summary, and our own plugin (I named it Detailer) for a place to store the block’s code.
The tutorial has been split into two parts: The first part — this one — covers how to create the plugin infrastructure to hold the blocks and the base code necessary to create and render a custom block. The second part (see update below) covers how to set up more complex and rich UI for the custom block, things like image uploads, toggles and select boxes in the side panel settings, etc.
Update 1/14/20
Confession: I had anticipated this tutorial to be much more popular than it turned out to be. For that reason, I delayed Part 2 (they take a very long time for me to write) and then ultimately decided to make the second part of the tutorial a collection of code samples rather than a step-by-step narrative. Further, since even collecting and testing all of the code snippets would take a while to complete in full I’ve published Part 2 as a working document where parts are added a little at a time.
tldr
The complete files as they are for this part 1 tutorial are on GitHub in the tutorial/part1 branch if you would like to skip and go straight to the end result. The full set of code (including code snippets from part 2) is on the master branch. There’s a quick README there that will tell you how to get running.
If this is confusing to you, run these commands to get the code to match this tutorial:
git clone git@github.com:davidyeiser/detailer.git
cd detailer
git checkout part1
git pull origin part1
And then if you want to view the code for this tutorial and part 2, run these commands in the detailer directory:
git checkout master
git pull origin master
Acknowledgements
I learned the basics of Gutenberg blocks from Zac Gordon’s Gutenberg Block Development Course. It was a very helpful and efficient way to grasp the core architecture of the Gutenberg system. The videos were easy to follow and if you want to learn more about Gutenberg I highly recommend it. There are a couple other Gutenberg courses as well, Gutenberg Theme Development and Advanced Gutenberg Development (in progress).
Also, the setup for the plugin that we create to house the code for our Gutenberg blocks comes from his How To Gutenberg plugin. There are other starter plugins for Gutenberg blocks out there, I like this one because it has a modern development workflow and doesn’t add a lot of cruft in terms of files and comments.
Outline
Part 1 has seven sections that cover how to setup a plugin and your first custom Gutenberg block.
Help
At any point if you encounter a step that doesn’t work as advertised or you get lost please file an issue on the companion GitHub repository and I’ll do my best to address it.
i Prerequisites
This tutorial assumes you’re pretty familiar with the WordPress environment (i.e. you’ve built sites with WordPress before). What’s very different about Gutenberg though is you’ll be writing a lot more JavaScript than you’re used to writing with WordPress. And to manage the JavaScript environment we will be using Webpack and Babel.
To get this portion running you’ll need Node.js and a package manager, either yarn or npm. I’m assuming you have used these to soem degree before. Mainly that you have them installed already and can run things like yarn and yarn run dev in your terminal. If that’s not the case you may need to make a detour and learn about Node.js and npm.
And last but not least, it’s not required for this tutorial but pretty much necessary to be able to test your plugin and custom Gutenberg block in a "live" installation of WordPress as we work through it all. In fact I’m assuming that when you start by creating the directory for your plugin that you’re creating it in the wp-content/plugins directory of a local WordPress installation.
Setting up a local WordPress environment with Docker is the easiest way to do this in my opinion and as it happens I have a tutorial on how to set up WordPress with Docker.
Okay, let’s get started.
1 Plugin Setup
The first thing we’ll need to do is set up a WordPress plugin which will house our custom WordPress Gutenberg block. You can place as many custom blocks as you want in a single plugin, but for sake of brevity we are only going to create one block. (It’s easy to add new ones, at the end of the next tutorial I’ll demonstrate briefly how to do that.)
Gutenberg blocks go in a plugin because generally they deal with functionality. Yes, it can get mixed depending on how much helper styles to the front-end rendering you decide to add, but the general consensus is custom Gutenberg blocks go in plugins, not themes. (Note that’s a human consensus, not a technical restriction, you can write code for Gutenberg blocks in themes, but I think it makes the most sense to keep them in a plugin.)
Our plugin is setup with a package.json file that will install the node modules to build the final assets referenced by WordPress. It’s a pretty interesting structure, essentially a PHP program that references JavaScript and CSS build files generated with Webpack and Node. And as mentioned before, the plugin structure and functionality was copied from Zac Gordon’s How To Gutenberg plugin. Credit to its cleverness goes to Mr. Gordon. Blame for any errors belongs to me.
In order to explain everything we’ll create each file and its contents step-by-step. If that’s not your thing, you can download the files on the GitHub repository and skip to Section 2 where we start writing the code for the Block Setup. However, if you want to learn what’s going on with everything, I’d follow along in this section and build each file.
First, create a directory to house your plugin. I named mine detailer. (You can either follow along with me exactly how I name things or you can start to create your own plugin and Gutenberg block. If you’re unsure, just follow along with me exactly how I name everything.) Then open your text editor and create a new file named package.json in this same directory.
Add the following code to that package.json file (make sure you copy everything below exactly how it is; JSON, if you don’t know, is very touchy):
{
"name": "detailer",
"version": "0.1.1",
"license": "MIT",
"main": "blocks/index.js",
"scripts": {
"dev": "cross-env webpack --watch",
"build": "cross-env NODE_ENV=production webpack -p"
},
"devDependencies": {
"@babel/core": "7.8.3",
"@wordpress/babel-preset-default": "4.9.0",
"autoprefixer": "^9.7.4",
"babel-loader": "8.0.6",
"cross-env": "6.0.3",
"css-loader": "3.4.2",
"mini-css-extract-plugin": "0.9.0",
"postcss-loader": "3.0.0",
"style-loader": "1.1.2",
"webpack": "4.41.5",
"webpack-cli": "^3.3.10"
}
}
In this block of code you’ll want to change name to whatever your plugin’s name is, and you can change the version if you’d like. Leave everything else how it is. The list of items in devDependencies are the packages we’ll install to manage our JavaScript and CSS assets. So now our directory structure should look like this:
detailer/
└─ package.json
Next we’ll create a couple other files related to our asset management workflow. In your text editor create two new files named webpack.config.js and .babelrc. (If the latter is new to you save it just like it’s written there, you may be prompted asking if that’s really what you want to do, say yes.)
Now in .babelrc paste this one object below and save the file.
{
"presets": [ "@wordpress/default" ]
}
And then in webpack.config.js paste the following (it’s long, sorry):
const path = require('path');
const webpack = require('webpack');
const MiniCssExtractPlugin = require('mini-css-extract-plugin');
// Set different CSS extraction for editor only and common block styles
const blocksCSSPlugin = new MiniCssExtractPlugin({
filename: './assets/css/blocks.style.css'
});
const editBlocksCSSPlugin = new MiniCssExtractPlugin({
filename: './assets/css/blocks.editor.css'
});
module.exports = {
entry: {
'editor.blocks': './blocks/index.js'
},
output: {
path: path.resolve( __dirname ),
filename: './assets/js/[name].js'
},
watch: 'production' !== process.env.NODE_ENV,
devtool: 'cheap-eval-source-map',
module: {
rules: [
{
test: /\.js$/,
exclude: /(node_modules|bower_components)/,
use: {
loader: 'babel-loader'
}
},
{
test: /style.css$/,
use: [
'css-loader',
{
loader: 'postcss-loader',
options: {
plugins: [ require('autoprefixer') ]
}
}
]
},
{
test: /editor.css$/,
use: [
'css-loader',
{
loader: 'postcss-loader',
options: {
plugins: [ require('autoprefixer') ]
}
}
]
}
]
},
plugins: [
blocksCSSPlugin,
editBlocksCSSPlugin
]
};
Just copy and paste that and don’t worry about what every line of code is doing (not least because I couldn’t even tell you with any authority). Just know that this takes your code and then compiles it nicely in one place for WordPress to reference.
So now your project should look like this:
detailer/
├─ .babelrc
├─ package.json
└─ webpack.config.js
The next step is to add a PHP file that will be our primary entry point for the plugin. This will be where we define the plugin details that appear in the WordPress admin area as well setup some other helper functions and enqueue our main scripts reference. Name this file to match your plugin name. I named mine detailer.php. If your plugin’s name is My Great Plugin, you can name the file something like my-great-plugin.php.
Create it in the same directory as the other files and add this code to it:
<?php
/**
* Bootstrap file to launch the plugin.
*
* @wordpress-plugin
* Plugin Name: Detailer
* Plugin URI: https://github.com/davidyeiser/detailer
* Description: Plugin to create custom Gutenberg block, Book Details.
* Version: 0.1
* Author: David Yeiser
* Author URI: https://davidyeiser.com/
* License: GPL2+
* License URI: http://www.gnu.org/licenses/gpl-2.0.html
*/
namespace DavidYeiser\Detailer;
// Exit if accessed directly.
defined('ABSPATH') || exit;
// Gets this plugin's absolute directory path.
function _get_plugin_directory() {
return __DIR__;
}
// Gets this plugin's URL.
function _get_plugin_url() {
static $plugin_url;
if (empty($plugin_url)) {
$plugin_url = plugins_url(null, __FILE__);
}
return $plugin_url;
}
// Enqueue JS and CSS
include __DIR__ . '/lib/enqueue-scripts.php';
After pasting that snippet you’ll want to change the plugin details at the top to match your plugin if you’re naming yours something different from mine. This is what WordPress references to display the plugin’s information in the backend of WordPress. One PHP thing that may stand out is the namespace declaration — this groups the function names into a particular space in order to avoid any naming conflicts. You can read more about namespaces here.
At the end you’ll see a reference to a file that doesn’t exist: lib/enqueue-scripts.php. Let’s go ahead and create that file now. In your plugin directory, create a new folder called lib and then create a file in that lib directory named enqueue-scripts.php. In the enqueue-scripts.php file paste the following:
<?php
namespace DavidYeiser\Detailer;
/**
* Enqueue JavaScript and CSS
* for block editor only.
*/
function enqueue_block_editor_assets() {
// Make paths variables
$block_path = '/assets/js/editor.blocks.js';
$style_path = '/assets/css/blocks.editor.css';
// Enqueue the bundled block JS file
wp_enqueue_script(
'davidyeiser/detailer/blocks-js',
_get_plugin_url() . $block_path,
['wp-i18n', 'wp-element', 'wp-blocks', 'wp-components', 'wp-editor'],
null
);
// Enqueue optional editor-only styles
wp_enqueue_style(
'davidyeiser/detailer/blocks-editor-css',
_get_plugin_url() . $style_path,
[],
null
);
}
add_action('enqueue_block_editor_assets', __NAMESPACE__ . '\enqueue_block_editor_assets');
Now unless you’re using the same namespace as me throughout this tutorial (totally fine), you’ll need to change three things in the code above. First change the namespace declaration to match the namespace you declared in the previous PHP file (the main plugin file). Then you’ll want to give a unique name to the first parameter of each wp_enqueue_style call. A good practice would be to use your namespace as the first slug, the plugin name as the second, and then you can keep the -blocks-js and -blocks-editor-css suffix the same. Just note how I made it lowercase and changed the backwards slash to forwards in the naming.
After making those changes the directory structure should look like this:
detailer/
├─ lib/
| └─ enqueue-scripts.php
├─ .babelrc
├─ detailer.php
├─ package.json
└─ webpack.config.js
We’re almost finished with this first section! The last file we need to create is where we’ll load our Gutenberg blocks. In the main plugin directory, create a new directory called blocks and in this directory create a new file called index.js. We’re not going to put anything in this file yet, but go ahead and add the comment below and save the file.
/* Blocks will be loaded here */
Your final directory structure for this section should look like this:
detailer/
├─ blocks/
| └─ index.js
├─ lib/
| └─ enqueue-scripts.php
├─ .babelrc
├─ detailer.php
├─ package.json
└─ webpack.config.js
The last two steps are running commands to make sure everything has been setup properly. First we’ll install the packages listed in our package.json file and then we’ll run the plugin’s dev script to make sure everything is hooked up and being outputted properly.
To install our node packages, open terminal, navigate to the main plugin directory and run:
yarn
(Or if you’re using NPM: npm install)
You should see a bunch of commands running and after it’s complete there should be a new directory in the main plugin directory called node_modules and another file named yarn.lock.
Now we have the tools to run the scripts to find and compile our JavaScript and CSS assets. In the same directory run the following command:
yarn run dev
(Or npm run dev if you’re using NPM.)
That should start a process in your terminal and also create another directory called assets. And in this assets directory you should see another directory js with a file in it called editor.blocks.js. This is one of the files Webpack generates for WordPress to use. Once we write some styles there will be another directory and file for the CSS as well. You’ll never need to edit any of these files as they are generated automatically.
The script you started in Terminal will not end unless there’s an error in your code that causes it to break, or unless you manually end it. The way to end the script manually is to go to the active tab in Terminal (make sure Terminal is the active app as well) and holding control type C to exit the process. You can easily start it again by typing yarn run dev.
After running both of these scripts our final file and folder structure should look like this:
detailer/
├─ assets/
├─ blocks/
| └─ index.js
├─ lib/
| └─ enqueue-scripts.php
├─ node_modules/
├─ .babelrc
├─ detailer.php
├─ package.json
├─ webpack.config.js
└─ yarn.lock
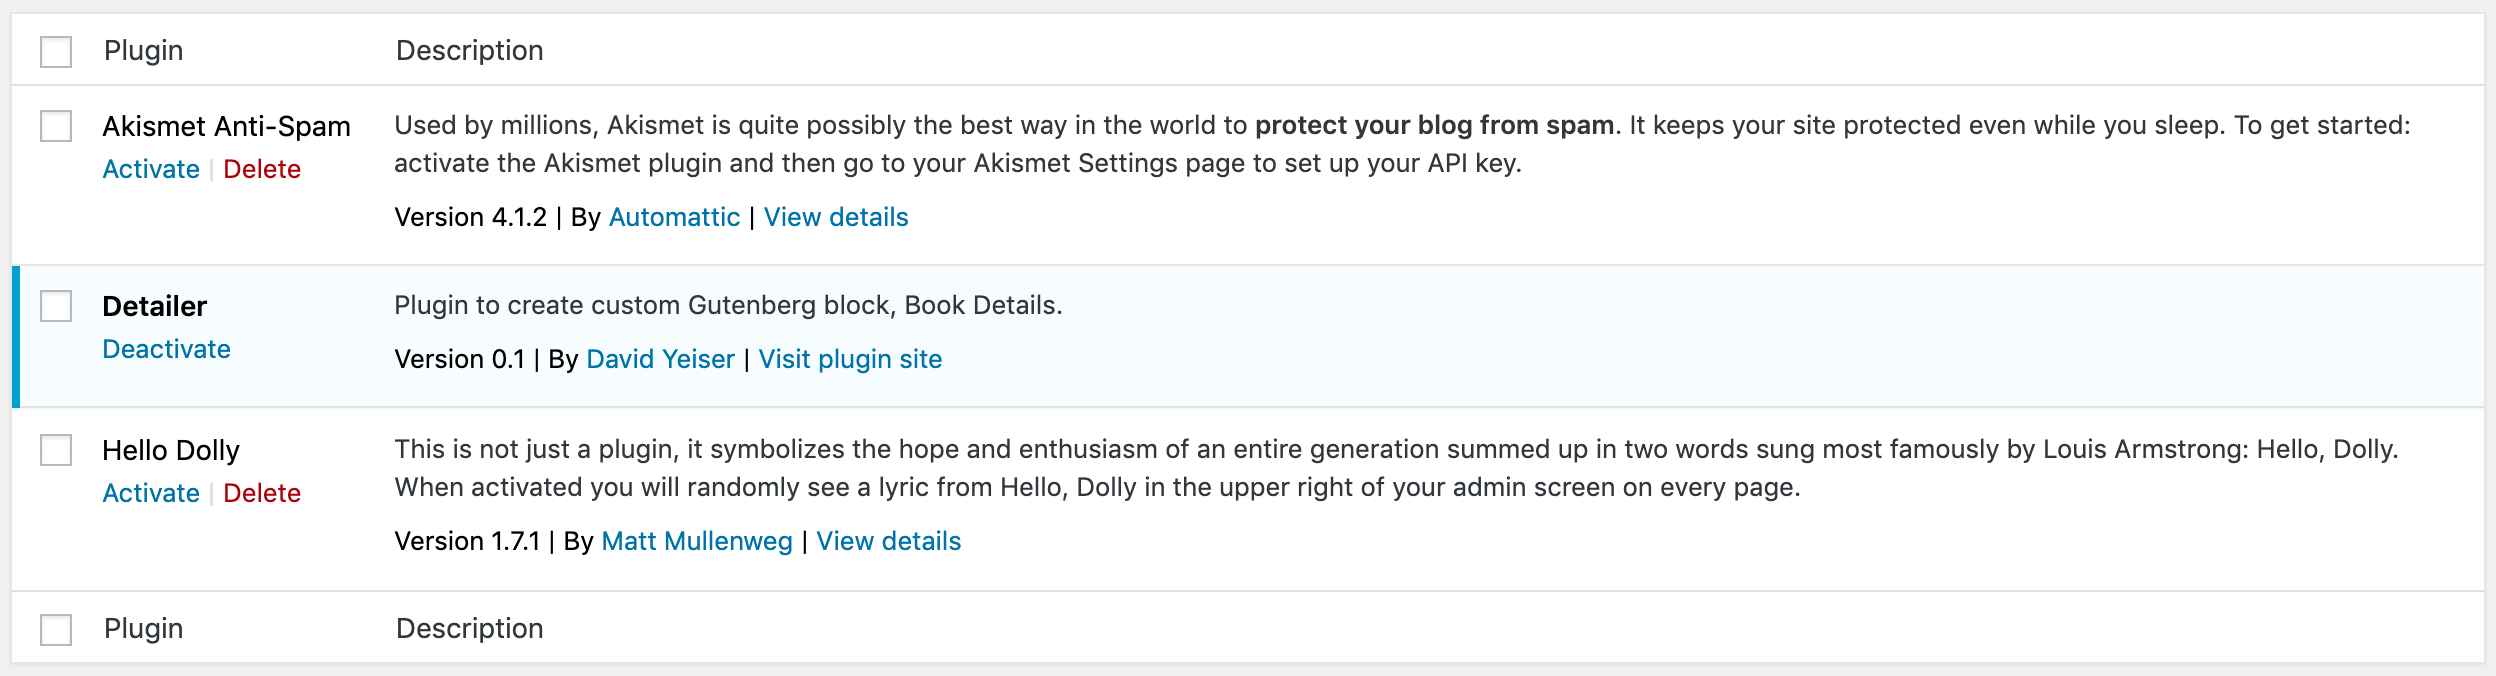
You’ll never need to create or edit anything in the assets or node_modules directories. You should also be able to see your plugin in the Plugins section of the WordPress admin. Go ahead and activate it.
Bonus
This would be a good time to check your code into a Git repository. We don’t go through how to do that in this tutorial as not to stray too far from the focus of creating a custom Gutenberg block for WordPress. However, if you do initialize it as a Git repository you’ll want to add a .gitignore file, which you’ll see in the repository for this tutorial since it’s on GitHub. (Likewise, you won’t see a node_modules folder in the GitHub project because it’s being ignored!)
2 Initial Block Setup
Now that we have our plugin set up we can start adding the code for our custom Gutenberg block. For this section we will be in the blocks subdirectory of our main plugin directory. As I mentioned before, you can have multiple Gutenberg blocks in one plugin, and even though we’re only writing one block in this tutorial we’re going to organize it as if it were one of several.
The first step is to create a new directory in the blocks directory and name it whatever your block will be named, in my case I named it book-details. In this book-details directory create a file named index.js and one named editor.css. These are where we’ll add the code and any necessary styles for our custom Gutenberg block. So the new directory structure for the blocks subdirectory should look like this:
├─ blocks/
| ├─ book-details/
| | ├─ editor.css
| | └─ index.js
| ├─ index.js
Now in our book-details/index.js file that we just created, add the following code:
/**
* BLOCK: Book Details
* ---
* Add details for a book to a post or page.
*/
// Import CSS.
import './editor.css'
const { __ } = wp.i18n
const { registerBlockType } = wp.blocks
registerBlockType('davidyeiser-detailer/book-details', {
title: __( 'Book Details' ),
icon: 'format-aside',
category: 'common',
keywords: [
__( 'book' ),
__( 'details' ),
],
// Enable or disable support for low-level features
supports: {
},
// Set up data model for custom block
attributes: {
},
// The UI for the WordPress editor
edit: props => {
return null
},
// The output on the live site
save: props => {
return null
}
})
Let’s go through this code. The first line simply imports our editor.css file to load any custom styles. This editor.css file is blank at the moment so nothing really happens here.
After the import statement you’ll see two const declarations — this imports the __ and registerBlockType functions from wp.i18n and wp.blocks. Don’t worry about how those are available to reference, we’ll cover that later when we return to this area to call other things like the components to render the various UI elements. At the moment these are all we need.
The __ function you are probably familiar with if you’ve been around WordPress for a while — it aids in translation of strings. However in this tutorial I’ve left out a text domain (the second argument in the function) so if you want your plugin to be translatable you’ll need to add that.
The registerBlockType function is what we use to tell WordPress about our block and it takes up the remainder of the book-details/index.js file. Documentation for registering blocks can be found in the Block Registration section of WordPress’s Block Editor Handbook. It has essentially two parameters: the unique name of the block and then a giant object of configuration options.
Naming a block is a little finicky as I learned from the JavaScript error log. Here is what the error in the console log says if you don’t do it correctly:
Block names must contain a namespace prefix, include only lowercase alphanumeric characters or dashes, and start with a letter.
The namespace prefix is segmented from the name of the block with a forward slash. I used the same namespace we defined earlier, but converted it from DavidYeiser\Detailer to davidyeiser-detailer/ and then added the book-details slug as the name of the specific block. The Block Editor Handbook has more on naming too.
After defining the name we open an object and define eight properties.
titleis the name of the block and how it will appear in the WordPress admin.iconis the icon that will be associated with the block. You can specify a keyword from the WordPress dashicons or you can specifiy a custom icon. To keep it simple I’m just using a dashicon. (Note that in the linked list of dashicons you’ll want to leave out the dashicons- portion of the reference. E.g. format-aside not dashicons-format-aside.)categoryis the category under which your block should be filed. There are five core categories that WordPress provides or you can create your own categories. I would just use one of the five for now.keywordsis an array of terms that can be entered in the Gutenberg block search box filter to find your custom block.
From here the properties begin to grow in complexity, but don’t get overwhelmed, it’s all very doable! supports is where you can either enable to disable certain core features of your block; if you leave it blank it will use the defaults. There are a few that are helpful to know so let’s add them.
In your code, change the supports object from:
// Enable or disable support for low-level features
supports: {
},
to:
// Enable or disable support for low-level features
supports: {
// Turn off ability to edit HTML of block content
html: false,
// Turn off reusable block feature
reusable: false,
// Add alignwide and alignfull options
align: false
},
The first one, html sets the ability for end-users to edit the HTML, in our case it disables it. This may or may not be desirable depending on your block, but if you want to turn it off that’s the parameter to do so. It’s on by default.
The next one reusable sets the ability for end-users to create reusable blocks from your block. In our case we disable it. Again, you may want to leave the ability for people to do this with your block, if so just leave this option out, it’s on (or true) by default.
And lastly, the align property if set to true adds additional layout options in the block’s toolbar for wide and fullscreen. These are the same controls you see with the Image block for example. They don’t make sense to add to this block so I’ve left this as false (it’s off by default) but I wanted to call this out because many times you’ll want these additional layout options.¹
The last three properties of the registerBlockType function form the primary substance of a custom block so we’ll cover each one of these in their own section.
3 Adding attributes
The attributes section of the register block function is where you define the data structure of your block. From the WordPress Block Editor Handbook:
Attribute sources are used to define the strategy by which block attribute values are extracted from saved post content. They provide a mechanism to map from the saved markup to a JavaScript representation of a block.
What we’re doing is looking at what makes up our block and then defining these things explicitly. For example I know that for my Book Details block I want a person to at least be able to add a title, author, and summary. So I will need to define these three attributes in this section. If that doesn’t make sense entirely don’t worry, it will as we go through the examples.
First, let’s define the title of the book. You define each item, or attribute, as its own object. Add the following code to the attributes section:
// Set up data model for custom block
attributes: {
title: {
type: 'string',
selector: 'js-book-details-title'
},
},
The property name title is the primary point of reference for the data that WordPress stores. These attributes will be scoped to our namespace so you don’t need to worry about making these names super unique.
Then in the properties for title, type tells WordPress what kind of data to expect; in this case a string, which will be the text that is our book title. And then selector is what connects the data store point with the corresponding UI element in the WordPress admin (which we’ll create in the next section). In our case we have opted to select the element by classname, which is what that string js-book-details-title is. The classname can be whatever you want, I prefixed it with js- out of a personal preference to keep classes that are used for JavaScript targeting separate from classes that you target for styling.
The selector property can be also be told to find the input with an element name, like h1. And along with the selector property you can also specify a source property where you can tell WordPress to grab the inner text of an element, the inner HTML, or specific attributes of the target (like the src attribute of an img tag). You can read through all the options in the Attributes section of the WordPress Block Editor Handbook.
I’m not going to go too deep into the specifics of attributes — not least because I would be the wrong person to chart that course — connecting the UI elements with a classname is enough for WordPress to parse the rest of what it needs. For our purposes we’ll leave it at that and use these two properties, type and selector, and another one called multiline which we’ll get to shortly.
Let’s add the other two attributes author and summary. (For Part 1 of this tutorial, we are just going to set up these three items of our Book Details block in order to focus on the base setup. Part 2 is where we’ll build out the rest of the block with the ability to upload a book cover image and so forth.)
// Set up data model for custom block
attributes: {
title: {
type: 'string',
selector: 'js-book-details-title'
},
author: {
type: 'string',
selector: 'js-book-details-author'
},
summary: {
type: 'string',
selector: 'js-book-details-summary',
multiline: 'p'
},
},
The author attribute is set up in the same manner as title, just with a different selector of course. And then summary is as well with the exception of adding an additional property called multiline. This tells the Gutenberg editor that a person can hit the return key when they are typing information in this part of the block to get a new line. And further, that when this block is saved, all of these new lines should be wrapped with a <p> tag.
To illustrate the multiline property quickly, if we were building a list, say for a recipe block, we could specificy multiline: 'li' instead and each line break would be wrapped in an <li> tag. And this would be reflected in the editor (a bulleted list by default) and the generated output on the frontend of the site. We’ll return to this subject again briefly in the next section as well.
Now that we have our attributes set, it’s time to move to the next section where we define what the UI looks like in the WordPress editor. But before we do that, let’s see what our block looks like so far in WordPress.
Go to the WordPress admin and create a new post or page and click the “add block” icon to insert a new block. If you look for our custom block you’ll notice it’s not there.
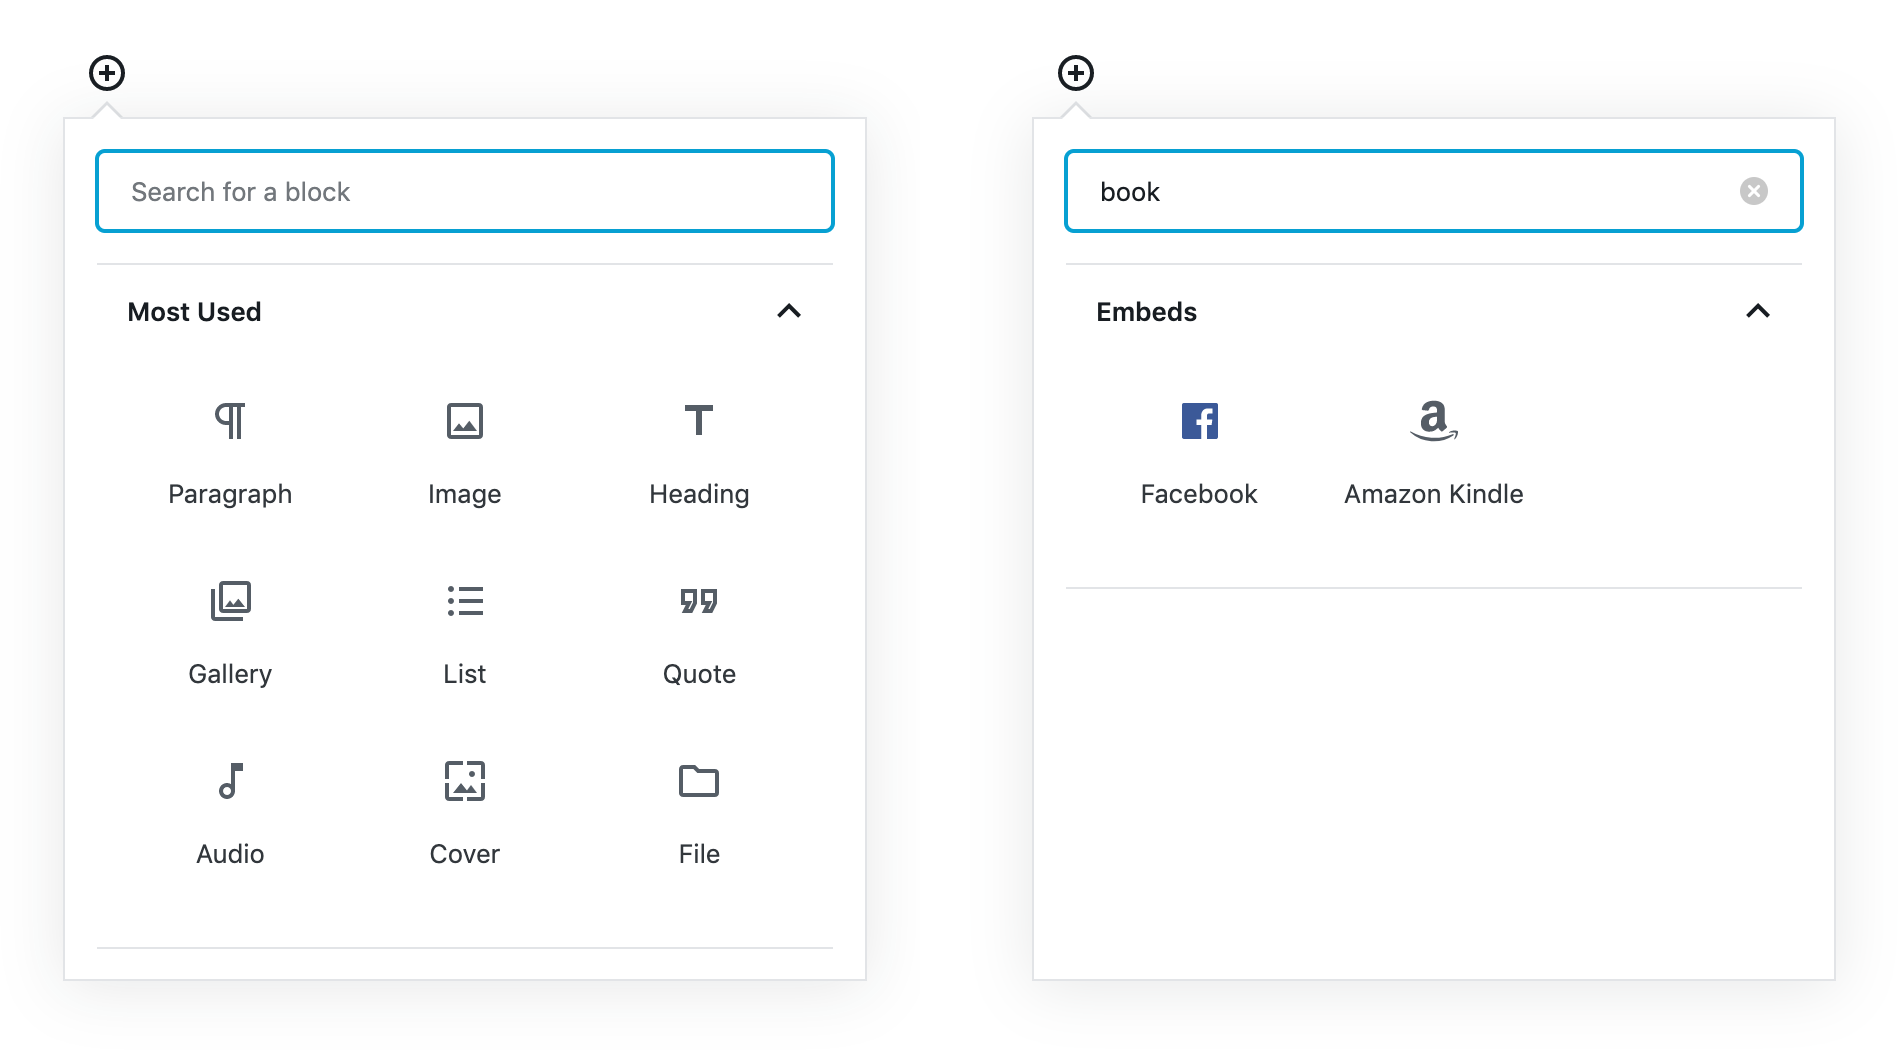
That’s because even though we’ve setup our registration function, we haven’t told WordPress that this block exists. Let’s go ahead and do that now.
Our file structure should look like this:
detailer/
├─ assets/
├─ blocks/
| ├─ book-details/
| | ├─ editor.css
| | └─ index.js
| └─ index.js
├─ lib/
| └─ enqueue-scripts.php
├─ node_modules/
├─ .babelrc
├─ detailer.php
├─ package.json
├─ webpack.config.js
└─ yarn.lock
The block we want to add to WordPress is the book-details directory. Let’s start from our main plugin file, detailer.php and work our way through how the block gets connected to WordPress. From our main plugin file we referenced one file, lib/enqueue-scripts.php, and from that file we hooked into a WordPress method named enqueue_block_editor_assets. In that method, we enqueue two files, a JavaScript file editor.blocks.js and a CSS file blocks.editor.css both located in the assets folder in a js and css directory respectively, both generated via Webpack.
So now let’s take a look at our Webpack file webpack.config.js. In module.exports take a look at the first two properties:
entrydefines the where Webpack will go to find the code to generate the single compiled file, andoutputdefines where Webpack will place the resultant file.
Notice that the output is assets/js/editor.blocks.js and the input is blocks/index.js. You may remember that the only thing in blocks/index.js at the moment is a single comment. So, if this Webpack config file is correct we should expect to find that comment in our generated editor.blocks.js file.²
Note: If you have not yet run yarn run dev in the plugin’s main directory do so now. Otherwise you won’t have the assets directory and the files within it. If you open editor.blocks.js in your text editor you’ll see a lot of crazy things but at the end you should see something like this:
eval("/* Blocks will be loaded here *///# sourceURL=[module] … [Lots of stuff here] sourceURL=webpack-internal:///0\n");
So all that to say, blocks/index.js is where we’ll import our new block in order for Webpack to pick it up and generate it for the enqueue_block_editor_assets in lib/enqueue-scripts.php called by our main plugin file, detailer.php. And a reminder that the credit for this nice setup goes to Zac Gordon, not me.
In blocks/index.js, change:
/* Blocks will be loaded here */
to:
/* Custom Blocks */
import './book-details'
All we’re doing here is importing our book-details directory. Webpack will automatically grab the index.js file in that directory. If you’ve left the yarn run dev script running then the new assets/js/editor.blocks.js file should be generated immediately. If not, run the script now to get your new file.
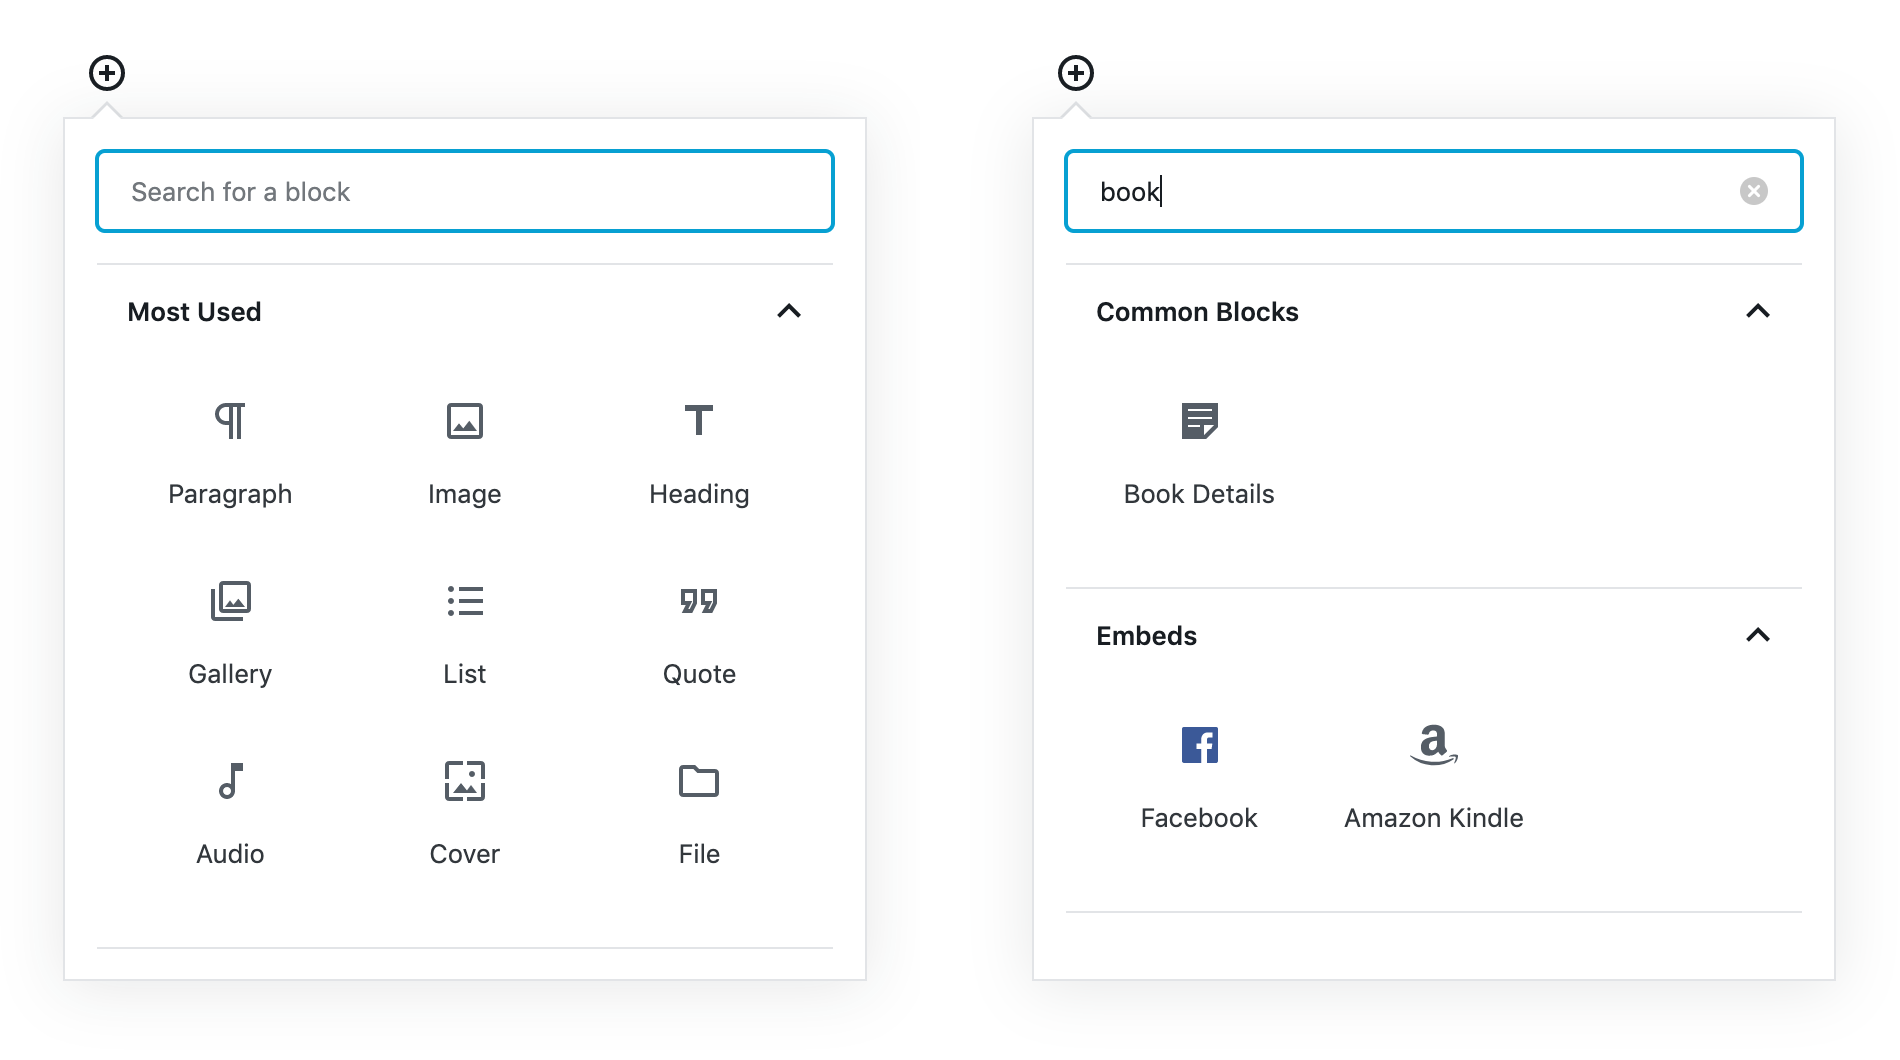
Now if you view the contents of editor.blocks.js, you should see the code for the custom Book Details block (albeit a bit garbled). And in WordPress you should now see the block:
Select the block and voila, nothing! That’s because even though we’ve defined all the settings and data attributes, we haven’t actually registered any UI for the admin or display for the frontend.
Let’s do the admin first.
4 Adding UI for the editor view
In this section we will construct the UI that appears in the WordPress admin when you add the Book Details block. This is what will allow the person to enter the title, author, and summary for the book. And as mentioned, Part 2 of the tutorial is where we’ll cover how to add more complex admin settings and UI display for a block.
The majority of the code we’ll write will go in the edit section of the registerBlockType method. You’ll notice that edit and save have as their value a function that receives a props object. This props object contains several properties. We will only use three in this tutorial:
attributes, an object that holds the values for the data structure we set up in the attributes section from before;className, a dynamically generated classname from WordPress that we’ll apply to our block’s outer DOM element to match the outer classname structure of the rest of the Gutenberg blocks; andsetAttributes, a function WordPress gives us to save data to our attributes (if your familiar with React, this is like setState()).
But we’re getting ahead of ourselves. First we’ll cover how to import the components we need to build the UI then we’ll go through building the UI.
Import Components
If you go back to our lib/enqueue-scripts.php file for a moment, you may remember an array of information that was passed in the wp_enqueue_script() function when we defined how our JavaScript would be loaded for our custom blocks. This array contains these values: 'wp-i18n', 'wp-element', 'wp-blocks', 'wp-components', 'wp-editor'.
These are packages associated with Gutenberg we tell WordPress to load for us so we can use them when writing our custom blocks. We’ve already used wp-i18n and wp-blocks to import the __ and registerBlockType functions. Now we’re going to use one more, wp-editor, to import a component to render our UI.
In blocks/book-details/index.js add the following line of code directly after the const definitions for __ and registerBlockType:
const { RichText } = wp.blockEditor
The new block of code should look like this:
const { __ } = wp.i18n
const { registerBlockType } = wp.blocks
const { RichText } = wp.blockEditor
RichText is the text input component that WordPress uses for the standard Gutenberg blocks. And we’ll use it for our block as well, tapping into the power of Gutenberg via this single component.
Building the UI
Now let’s return to the edit section of the registerBlockType function. In this edit section, we are going to write the code that is rendered in the WordPress admin when our block is inserted. If you’ve worked with React before this will all be very familiar to you, and if you haven’t don’t despair, it’s not difficult and we’ll walk through each step.
First let’s remove the return null and replace it with code that just renders some static text when the block is inserted so it’s not completely blank.
Change:
edit: props => {
return null
},
to:
edit: props => {
// Pull out the props we'll use
const { attributes, className, setAttributes } = props
return (
<div className={className}>
Hello WordPress
</div>
)
},
The first thing we do is extract three properties from the props object using JavaScript’s ES6 syntax. This is called destructuring and all its saying is take attributes, className, and setAttributes from props and make them each a standalone const variable of the same name. (Wes Bos has a great article on destructuring objects if you want a fuller explanation.) After doing this we can call these three variables as needed, which we will do in the return function later.
Next is the return render method. Everything inside of return() is what is rendered when our custom block is inserted in the admin editor. Right now that’s just a div with a className attribute (see note) that contains static text.
Now let’s see what our custom block looks like when we insert it into WordPress. If you don’t already have the dev script running for the plugin, run yarn run dev in the main plugin directory and then create a new page or post and insert our custom block. You should see some very basic text styling that reads, Hello WordPress.

If you inspect the element you should see the markup that matches our code in the return() function we wrote above:
<div class="wp-block-davidyeiser-detailer-book-details">Hello WordPress</div>
Note that the custom classname was automatically generated by WordPress from the namespace and block name. Now let’s change the static text to something that will actually let you enter content.
In the same code block we’ve been working in, change:
return (
<div className={className}>
Hello WordPress
</div>
)
to:
return (
<div className={className}>
<RichText
className="js-book-details-title"
value={attributes.title}
onChange={value => setAttributes({ title: value })}
tagName="h3"
placeholder="Book title"
/>
</div>
)
In place of our static text we’ve added the RichText component that we imported earlier. The RichText component has a large amout of props that can be accessed as needed. The full list of these props is documented in the WordPress Gutenberg GitHub repository, we’ll go through each of the ones we used below.
classNameis just like any other className prop, it renders as an HTML class. However, note the specificity of our classname here as it matches the selector property of thetitleattribute we set in Section 3. This tells WordPress to connect this RichText component to the title attribute.valuesets a variable to be used as an editable HTML string for the component, in our case thetitleattribute from Section 3.onChangeis a built-in function that will run whenever the value changes. We’ll go over this one in more detail below.tagNamespecifies the markup tag you would like to wrap the contents of this component in. That is, the user input into this RichText component will be wrapped in whatever component you specify here.placeholdersets placeholder help text like you would on an HTML input.
You’ll notice some of the props are wrapped in quotes and others in braces. Props wrapped in quotes are plain text strings (e.g. our classname and the placeholder text) and props wrapped in curly braces are JavaScript code. Our value prop for example receives a “live” JavaScript variable, whereas the className prop receives a static text string.
onChange
Let’s talk for a minute about the onChange prop. As mentioned prior, it’s a function that runs any time the value prop changes. Since value changes anytime something is typed into the RichText component, the onChange function is being run with each keystroke.
What happens in the onChange function is as follows: The value³ of the RichText component is being passed to the return statement of the onChange function (the right side of the arrow, =>). We take this value and pass it to the setAttributes() function. The setAttributes function is a simple function that takes an object to the main attributes object, finds the matching property it was given and then updates that property with whatever value has been passed. This all happens instantly.
Now let’s backup a bit and talk about the value prop itself. We specify our value prop as value={attributes.title}. So whatever is in attributes.title is what will display as the content of our RichText component. When the block is first inserted attributes.title is blank so the RichText component will be blank. However, as we type each keystroke is being saved by setAttributes in onChange and then being re-rendered in the RichText component as the new content of attributes.title.
Thus, attributes.title is always representative of whatever has been typed into the RichText component. And if you save the post (or page or whatever) WordPress will save whatever content happens to be currently in attributes.title. If you’re confused after reading all that then just forget about it and move on. Seriously, you don’t need to have a comprehensive understanding of everything that’s going on. Some of it will start to make more sense as we add more elements.
Let’s refresh our page in WordPress and your block should look something like the image below. Note that when the block is active the placeholder text will disappear similar to the behavior of the input.

Don’t worry if yours doesn’t look exactly like my screenshot. The display will render differently if the theme has admin styles associated with it. In this tutorial I’m using the 2019 theme which uses admin styles to match the editor to the theme’s design.
If you inspect the element in the editor you should see an h3 element with a lot of helpful attributes rendered by the RichText component:
<h3 role="textbox" aria-multiline="true" class="block-editor-rich-text__editable editor-rich-text__editable js-book-details-title" contenteditable="true" data-is-placeholder-visible="false" aria-label="Book title" aria-autocomplete="list">Book title is here</h3>
Next let’s add a field for the book’s author — it’s a simple copy and paste job. Copy the RichText component we used for the title, paste it directly below and then change the new component’s attributes to the following:
return (
<div className={className}>
<RichText
className="js-book-details-title"
value={attributes.title}
onChange={value => setAttributes({ title: value })}
tagName="h3"
placeholder="Book title"
/>
<RichText
className="js-book-details-author"
value={attributes.author}
onChange={value => setAttributes({ author: value })}
tagName="span"
placeholder="Book author"
/>
</div>
)
We’re using the same RichText component for the author field, but this time we’ll set the tagName prop as a span; and then of course we’ll need to change all of the title references to author in order to tie it to the author data field that we setup in the attibutes section. Note that the onChange function’s value is relative to the component, so there’s no need to make these unique.
If you refresh the page in WordPress your component should look something like the image below. Note that you may have to do a hard refresh to clear the cache. In Chrome the keyboard shortcut is command + shift + r.

Go ahead and add a book title and author and then save:

The content should remain after you save.
Now let’s add the RichText component for the book’s summary. The setup will be slightly different this time because we’re going to allow the user to type multiple paragraphs of text. You can type multiple lines of text in the other two RichText components but they would be saved as manual line breaks (br elements). What we want for the summary is to save each line break as a new paragraph. This is accomplished with one extra prop called multiline.
Copy and paste one of the RichText components and update your code to match:
return (
<div className={className}>
<RichText
className="js-book-details-title"
value={attributes.title}
onChange={value => setAttributes({ title: value })}
tagName="h3"
placeholder="Book title"
/>
<RichText
className="js-book-details-author"
value={attributes.author}
onChange={value => setAttributes({ author: value })}
tagName="span"
placeholder="Book author"
/>
<RichText
className="js-book-details-summary"
value={attributes.summary}
onChange={value => setAttributes({ summary: value })}
tagName="div"
placeholder="Book summary"
multiline="p"
/>
</div>
)
Just like with author, we change the references for summary to match our corresponding value we set in attributes. Then we change the tagName prop to div since it’s going to hold multiple p tags (it’s up to you to ensure the rendered result is valid markup) and the we set our multiline prop as p. We touched on this briefly in Section 3 when we set up our summary attribute to expect multiline p tags, but to go over it again let’s say you wanted this to be a list rather than a summary, in that case you would set the tagName prop as ul or ol and then the multiline prop as li. The tagName prop defines the wrapper element of the parent and then multiline defines the wrapper element for the children, separated and defined in the admin UI with line breaks.
Refresh the page and your block should now have a summary:

Now if we type a couple lines of text and inspect the source you can see the RichText component is following our instructions.
<div role="textbox" aria-multiline="true" class="block-editor-rich-text__editable editor-rich-text__editable js-book-details-summary" contenteditable="true" data-is-placeholder-visible="false" aria-label="Book summary" aria-autocomplete="list">
<p>This book was very good.</p>
<p>I really enjoyed it.</p>
</div>
You have now completed the UI for the WordPress editor. However, let’s cover one more thing before we move on. Type two paragraphs and save the block:

That’s not bad, but it could be better. The spacing and styling makes the first line of the summary look like it’s associated with the author’s name more than the rest of the summary. We should add some helper styles to create a better experience in the editor.
This is where we use the editor.css file that we created as part of the block directory. It’s already being imported by the block’s index.js at the very top, all we need to do is add some styles and target our elements with a classname. We could use the same classnames that are already there (e.g. js-book-details-summary) but let’s go ahead and create new classes for styling purposes. Update your code to match below:
return (
<div className={className}>
<RichText
className="js-book-details-title wp-admin-book-details-title"
value={attributes.title}
onChange={value => setAttributes({ title: value })}
tagName="h3"
placeholder="Book title"
/>
<RichText
className="js-book-details-author wp-admin-book-details-author"
value={attributes.author}
onChange={value => setAttributes({ author: value })}
tagName="span"
placeholder="Book author"
/>
<RichText
className="js-book-details-summary wp-admin-book-details-summary"
value={attributes.summary}
onChange={value => setAttributes({ summary: value })}
tagName="div"
placeholder="Book summary"
multiline="p"
/>
</div>
)
And then in editor.css add the following CSS:
.wp-admin-book-details-author {
font-style: italic;
}
.wp-admin-book-details-summary {
margin-top: 24px;
}
Refresh the page and now we have a clearer picture of our data structure.

5 Displaying the output
Now that we have the ability to collect and save information in the WordPress admin, we need to write the code to display it on the frontend of the website. If you view the saved post (or page) you will see there’s nothing there:

To display the saved data we need to add code to the save section of the registerBlockType method like we did in the edit section. Change the save block of code in /blocks/book-details/index.js from:
// The output on the live site
save: props => {
return null
}
to:
// The output on the live site
save: props => {
const { attributes, className } = props
return (
<div className={className}>
Hello website
</div>
)
}
The setup is pretty similar, we pull out our attributes and dynamic className from props in order to use in our return render function (in this case we don’t need setAttributes as we will not be saving any data, just rendering what we have) and then to do a quick test we just return a div with some static text. If you refresh the page now you will expect to see “Hello website” displayed on the page. But, it’s blank still.
Let’s go back to our editor view and refresh the page:

What you see there is a result of Gutenberg’s block validator. Whenever you make changes (any changes) to the contents of return in the save method of registerBlockType for a block that has already been added as content to a post (or page, etc.) the block invalidates and you must manually fix it. The way you fix it is you can convert it to HTML or back to Blocks. Honestly I’m not sure what it’s trying to do, but either selection in our case just removes the block. Which is actually the easiest way to fix it: just delete the block and re-add it.
But to always have to remove and re-add blocks whenever you make a change gets impractical very quickly. There is an active community discussion on how to make this experience better, and this thread on GitHub is a good place to start if that conversation interests you. That said, the merits and methods of this validation checking is outside the scope of this tutorial, what’s important for you to know is there is a way around block validation.
If you use dynamic blocks it bypasses this validation check by Gutenberg. Dynamic blocks are PHP files that are rendered as blocks in place of the JavaScript components you would have written in the save method. They are setup in a similar manner, just with PHP rather than JavaScript. We are going to use dynamic blocks to render our content, but before we do that let’s cover quickly how you would write a static block as I think it’s good to know.
First, let’s delete the block in WordPress that we created earlier, re-add it (just leave it blank for now) and save it. The error should be gone and on the frontend (I’m calling the rendered block on a user-facing website the frontend) you should see our static text now.

Now let’s add the actual code to render the user input from the admin. Very briefly, you use the same RichText component but in this case you need to access the Content portion of the RichText component which you do with a simple dot selector. Then you pass it the same props as before with the exception of onChange and placeholder, leaving those off as those have no purpose when we’re rendering the content.
So in the returnblock of save change:
return (
<div className={className}>
Hello website
</div>
)
to (note the RichText.Content):
return (
<div className={className}>
<RichText.Content
className="book-details-title"
value={attributes.title}
tagName="h3"
/>
<RichText.Content
className="book-details-author"
value={attributes.author}
tagName="span"
/>
<RichText.Content
className="book-details-summary"
value={attributes.summary}
tagName="div"
multiline="p"
/>
</div>
)
Now, go back to the WordPress admin, refresh the page, delete the block because you’ll see a validation error again, and then re-add it with content again:

Save it, refresh the page on the frontend and you should now see your book details:

Now using our theme files we could target the classnames we setup in the save method (e.g. book-details-title) to add custom styling to the elements. But with dynamic blocks the save method in registerBlockType is not used at all so let’s change it back to a null return to prep for dynamic blocks.
Change:
// The output on the live site
save: props => {
const { attributes, className } = props
return (
<div className={className}>
<RichText.Content
className="book-details-title"
value={attributes.title}
tagName="h3"
/>
<RichText.Content
className="book-details-author"
value={attributes.author}
tagName="span"
/>
<RichText.Content
className="book-details-summary"
value={attributes.summary}
tagName="div"
multiline="p"
/>
</div>
)
}
Back to:
// No save, dynamic block
save: props => {
return null
}
Then in WordPress delete the block again because it will have a validation error. Now we’re ready for dynamic blocks!
6 Setting up a dynamic block
With a dynamic block you have to register the PHP counterpart with WordPress outside of the JavaScript-based registerBlockType function we’ve been working with. You do this by passing the name of the block to WordPress via the register_block_type function which ties the two environments together.
In this section we’ll set up the necessary files and references to do this. Then in the next section we’ll write the code that renders the contents for the block. create the file and the necessary links.
To keep everything organized, we are going to write the majority of the code for the dynamic block in a single file index.php that lives in the block’s directory. Add a blank index.php file to our block directory like so:
├─ blocks/
| ├─ book-details/
| | ├─ editor.css
| | ├─ index.js
| | └─ index.php
| ├─ index.js
We’ll do two things in this index.php file: register the dynamic block and then render it. Let’s set up the registration first. Open the index.php file and add the following code:
<?php
namespace DavidYeiser\Detailer\Blocks\BookDetails;
add_action('plugins_loaded', __NAMESPACE__ . '\register_dynamic_block');
function register_dynamic_block() {
// Only load if Gutenberg is available.
if (!function_exists('register_block_type')) {
return;
}
// Hook server side rendering into render callback
// Make sure name matches registerBlockType in ./index.js
register_block_type('davidyeiser-detailer/book-details', array(
'render_callback' => __NAMESPACE__ . '\render_dynamic_block'
));
}
function render_dynamic_block($attributes) {
return 'Hello PHP block';
}
It looks a little messy, but once you untangle the keywords and references it’s a pretty straight-forward process.
The first thing we do is define a unique namespace for this file. Then using that namespace we hook the register_dynamic_block function into the plugins_loaded add_action method. Then in the register_dynamic_block function we first check to make sure Gutenberg is available by testing if the register_block_type function exists. This function is only in Gutenberg so if it’s not there we know neither is Gutenberg and we exit the function before we actually try to call register_block_type so we don’t cause any errors.
But if it is there, which it will be in our case, it proceeds to the register_block_type function. The first argument of that function is a name, this name should match exactly the name used in the first argument of the registerBlockType function in our block’s index.js file. The second argument is an array of options, in our case just one: render_callback. The value of render_callback is a reference to the final function — the one we’ll use to render the dynamic block — render_dynamic_block. (Note how the namespace is used here again.)
So register_block_type tells WordPress to register this extra render_callback option to the Gutenberg block which executes the contents of the function render_dynamic_block just below it.
In this render_dynamic_block function you’ll see a single argument, $attributes. This is an object that contains the same attributes that you would find in the save method of the registerBlockType function of the block’s index.js file. For now though we’ll just return some static text so we can make sure everything is hooked up properly before we get into parsing the attributes.
The last step to register the block is to make WordPress aware of our new index.php file. To do that we call it from our main plugin file. Open the main plugin’s detailer.php file (or whatever yours is called) and add this code at the very bottom (view full context on GitHub):
// Load dynamic blocks
include __DIR__ . '/blocks/book-details/index.php';
Make sure yarn run dev is running from the main plugin directory and go back to the WordPress admin. It should be blank since we deleted the block at the end of the prior section. Add the Book Details block again and then save it (you can leave the block blank). Then on the frontend of the site, refresh the page and you should see our static return message from the block’s index.php file.

7 Writing the code for a dynamic block
The last part of Part 1 of this tutorial is to write the code that renders our dynamic block content on the frontend. Let’s start by replacing the static text in the return of render_dynamic_block with a function that will show us what’s in attributes. But before you do that go back to the WordPress admin and fill in the details for the Book Details block again so we can have some content to work with.

Once that’s done (save the post) we need to set up render_dynamic_block’s return to be able to handle HTML output. A lot of times you’ll see this done with PHP’s sprintf function, however this can get complicated to read as the complexity of your HTML grows. What I like to use instead is PHP’s output buffer. This allows you to write WordPress template code just like you would in any other PHP file.
Let’s set up the basic framework for using output buffer. In the block’s index.php file, change this:
function render_dynamic_block($attributes) {
return 'Hello PHP block';
}
To this:
function render_dynamic_block($attributes) {
ob_start(); // Turn on output buffering
/* BEGIN HTML OUTPUT */
?>
<pre>
<?php print_r($attributes); ?>
</pre>
<?php
/* END HTML OUTPUT */
$output = ob_get_contents(); // collect output
ob_end_clean(); // Turn off ouput buffer
return $output; // Print output
}
Note how PHP was closed with ?> and then reopened again after the HTML portion. And also note how PHP was written inline with the HTML just like you would on a regular PHP page. A discussion of output buffer is way outside the scope of this tutorial, but what’s happening here as far as my minimal research has told me is that we open the buffering with ob_start() and start collecting output, that output is then stored to the variable $output and the buffer cleaned and closed with ob_end_clean(). Then at the end of the function we return the $output variable which renders all of the collected output (the rendered HTML markup) on the page.
Now if you refresh the page you’ll see the contents of $attributes printed on the page. And if you view the source you should see something like the following:
<pre>
Array
(
[title] => Another Book Title
[author] => Author Yet Again
[summary] => <p>This is the summary of the book.</p><p>It has two paragraphs.</p>
)
</pre>
The title and author attributes are plain text, and the summary attribute is a collection of p tags with our content. Everything you need to render your block on the frontend is stored in $attributes. Now let’s add explicit variables to pull out our individual attributes (and remove the $attibutes output):
function render_dynamic_block($attributes) {
// Parse attributes
$book_details_title = $attributes['title'];
$book_details_author = $attributes['author'];
$book_details_summary = $attributes['summary'];
ob_start(); // Turn on output buffering
/* BEGIN HTML OUTPUT */
?>
<?php
/* END HTML OUTPUT */
$output = ob_get_contents(); // collect output
ob_end_clean(); // Turn off ouput buffer
return $output; // Print output
}
Then we’ll add some markup structure around the output of our content:
function render_dynamic_block($attributes) {
// Parse attributes
$book_details_title = $attributes['title'];
$book_details_author = $attributes['author'];
$book_details_summary = $attributes['summary'];
ob_start(); // Turn on output buffering
/* BEGIN HTML OUTPUT */
?>
<div class="block-book-details">
<h3 class="block-book-details-title"><?php echo $book_details_title; ?></h3>
<span class="block-book-details-author"><?php echo $book_details_author; ?></span>
<div class="block-book-details-summary">
<?php echo $book_details_summary; ?>
</div>
</div>
<?php
/* END HTML OUTPUT */
$output = ob_get_contents(); // collect output
ob_end_clean(); // Turn off ouput buffer
return $output; // Print output
}
Now if you refresh the page on the frontend you should see the content that was entered into the block in the backend (notice how as we’re changing the render code in the dynamic block file the block in the admin stays intact).

And we’re finished! You now have a fully functioning custom dynamic Gutenberg block. In Part 2 of this tutorial (currently in progress) we’ll look at how to add more features to our custom block like the ability to upload an image and render it with WordPress’s custom image sizes, a toggle for favorite books that appears in the side panel settings for the block and so forth.
And again, if you run into any troubles with Part 1 file an issue on GitHub and I’ll do my best to help.
Update 1/17/20
I updated the Node packages to be current and replaced the deprecated extract-text-webpack-plugin with the recommended mini-css-extract-plugin and updated webpack.config.js accordingly. In index.js, the deprecated RichText component call from wp.editor was updated to wp.blockEditor. The tutorial has been updated to reflect these changes.
Also, since part 2 of this tutorial series will begin adding new functionality to the plugin, I preserved the state of the plugin as it is at the end of this tutorial in the tutorial/part1 branch.
Footnotes
- Note that if you want to enable these for your block you’ll also need to add this line of code somewhere in your theme’s functions.php file (or equivalent):
add_theme_support('align-wide');(source) - In this case you’ll only see the comment because we are running the script in dev mode. When we run it for production it will strip out any comments.
- You can name the variable
valueanything you’d like, whatever the name of it it will carry the same value, I use value because it helps describe what’s going on.
Other Tutorials
- Docker + WordPress Setup
- → Create Your Own Dynamic Gutenberg Block for Wordpress, Part 1
- Create Your Own Dynamic Gutenberg Block for Wordpress, Part 2
- Installing Composer
- How to Create a Blog with the Airtable API & Next.js